

The Mac’s keyboard, for the most part, works pretty well. Sure, Apple’s had some issues with MacBook keyboards in the past, but most Apple keyboards still work like a charm whether you’re working or chatting with someone. Of course, that doesn’t mean that’s the only way to write all your thoughts. Mac computers have other features that help you write everything down quickly without barely moving your fingers. We’re talking about the Mac’s built-in Dictation feature.
The Dictation feature lets you turn your Mac into your assistant. You can talk all you want, and your Mac will write everything down for you. This is super useful if you’re behind on an assignment or just don’t want to type at all. If you want to start dictating your Mac instead of writing everything for yourself, here’s everything you need to know.
How to Enable Dictation on Your Mac
First, you need to make sure you can use the Dictation feature on your Mac. For that, you’ll need to enable this feature in your Mac settings like this:
- Click on the Apple menu on the top left corner of your screen.
- Select System Preferences.
- Click on Keyboard.
- Click on the Dictation tab at the top of the window.
- Toggle Dictation on if it isn’t already.
- A pop-up window will appear. Click on Enable Dictation. You can also click About Dictation and Privacy to learn more about this feature.
- When you’re done, you can close the window.
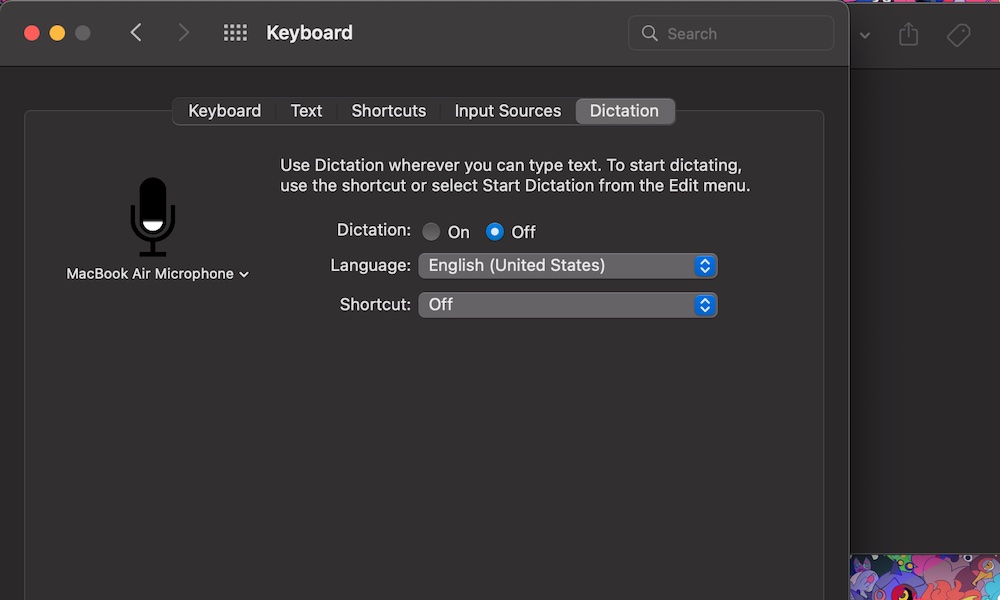
Now Dictation is enabled on your Mac! As you probably saw in the settings, you can also change the language you want to use to dictate to your Mac. There are a lot of languages to choose from, and you won’t need to change your Mac’s primary language to use it.
You can also create a shortcut to trigger Dictation. If you click the drop-down menu, your Mac will give you a list of default shortcuts, but you can also create your own as long as that keyboard shortcut doesn’t already exist. It’s worth noting that some MacBook keyboards already have a dictation shortcut located in the F6 key.
It’s also worth noting that Dictation sends information like your voice input, contacts, and location to Apple to process your requests. If you feel that’s something you don’t want to share with Apple, you should turn Dictation off.
How to Use Dictation on Your Mac
Now onto the fun part. Let’s start using Dictation and let our Mac do the job for us.
- First, open an app where you can type. It can be Microsoft Word, Apple Pages, Safari, or any other app where you can type.
- Put your cursor in the place you want to write.
- Trigger dictation with the keyboard shortcut you chose. In some apps, you can also press Fn + D. You can also click on Edit on the menu at the top and select Start Dictation.
- A small microphone will pop up to the right side of where your cursor is. Start talking, and your Mac will do the rest.
And that’s it. You can now start using dictation on your Mac. Do you want to know how well it works? Well, I just wrote this paragraph with my voice, and it didn’t have any mistakes.
How to Master Dictation on Mac
Granted, it’s not perfect. Sometimes your Mac will hear some things that you didn’t even think about writing, but, hey, it’s still an awesome and free way to help you “write” faster.
Still, you can do a few things to make your dictation better. First, enunciate as best as you can. The clearer the words come out of your mouth, the easier it’ll be for your Mac to understand and write what you’re actually saying. Also, don’t talk too fast, but you don’t have to go too slow either. It takes a moment to get the hang of it.
If you want to add a period or a comma, all you need to do is say “period” or “comma,” or “question mark.” Your Mac will understand what you mean by that.
Last but not least, double-check your work. Whether it’s an essay for school or an email for your boss, always proofread and edit what your Mac wrote. It’ll be a bit hard to explain how your messy writing is your Mac’s fault and not yours.